Map columns & required fields
After New Import parses your file, the wizard moves to Step 2 · Column Mapping. An information banner confirms how many rows were found and reminds you that you can rename columns and exclude columns on this step.
Work through the mapping table first to satisfy the Required Fields panel, then click Continue to Preview (N rows) to advance to the next step.
The mapping table
The mapping table lists one row for each column in your CSV file. Each row has three columns:
| Column | What it does |
|---|---|
| CSV Column | The raw header from your file (read-only). |
| Include | Tick to include this column in the import; untick to exclude it entirely. |
| Maps to Field | The field this column's values are imported into. Defaults to the CSV header — edit it to fix a mismatch. |
Fixing a mismatch without editing the file: if your CSV headers do not exactly match the portal's field names, type the correct name into Maps to Field. For example, a file with the headers Item Name, Details, and Location would leave the Name, Place, and SKU tiles red in the Required Fields panel. Typing Name, Description, and Place into the corresponding Maps to Field inputs resolves the mismatch.
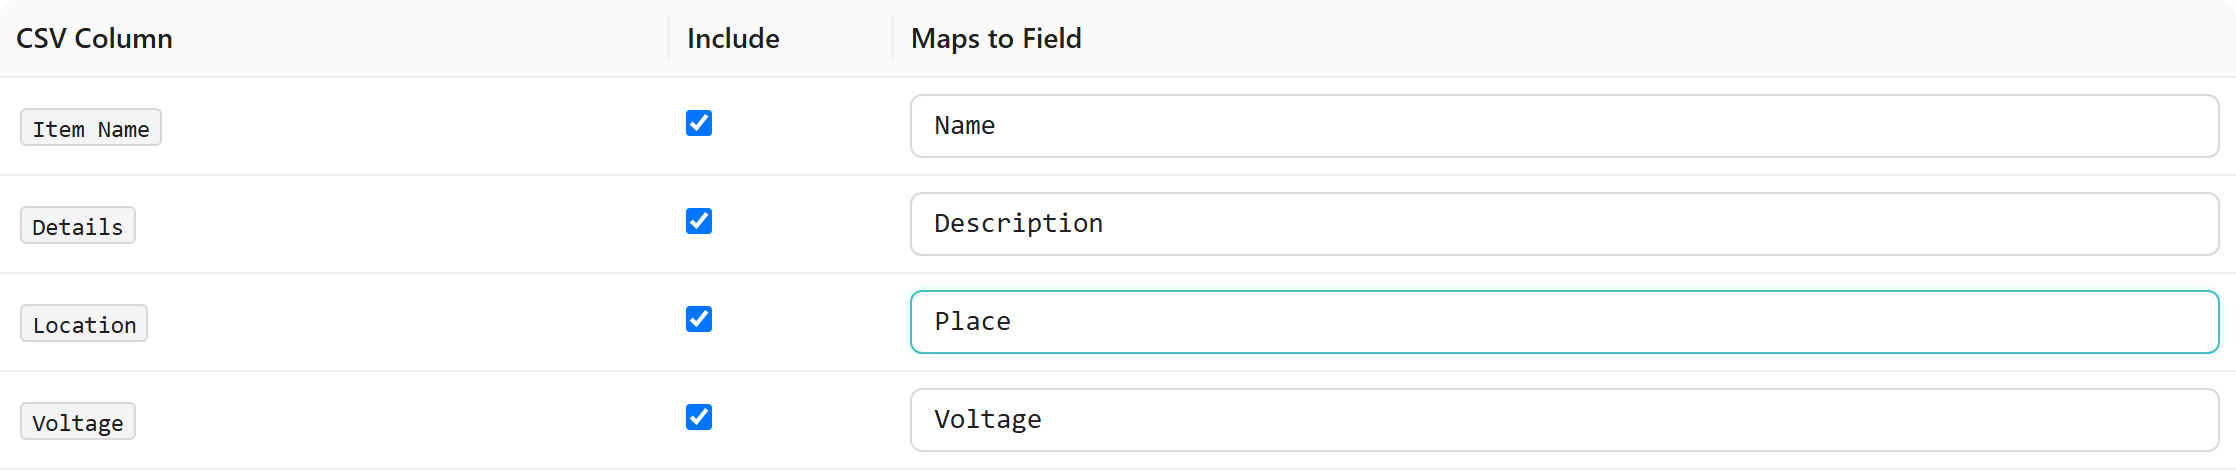
For the exact field names accepted by each upload type, see Column reference by upload type.
Columns the wizard handles for you
Three column types are handled automatically and do not need to be renamed or excluded manually:
TemplateandCategoryheaders — these values come from the picker tiles in the Required Fields panel rather than from a column in the file. If your CSV includes aTemplateorCategoryheader, the wizard strips it from the mapping table before the step loads.Resultheader — if you export the results table after a previous upload and re-import that file to correct errors, theResultcolumn is parsed but its Include checkbox is unticked by default. This prevents stale result values from being injected into the new upload.
If a previous upload had errors, export the results table, fix the data rows, and re-upload the file. The Result column from the export is excluded automatically — you do not need to remove it from the file first.
The Required Fields panel
The Required Fields panel sits below the mapping table. It shows a tile for every field that must be present before the upload can proceed, together with a n/m present counter at the top.
Each tile is coloured:
- Green (with a check icon) — the field is satisfied: a mapped CSV column matches this field name, or an override value has been set via a picker tile.
- Red (with an × icon) — the field is missing: no column maps to it and no override is set.
The unique field you chose on the first step appears as its own tile alongside the other required fields.

Continue to Preview (N rows) becomes available as soon as the file has been parsed — it is not gated on the Required Fields panel. The Upload button on Step 3 (Preview & Upload) is what stays disabled until every required tile is green and every reference field in the Reference Field Mapping panel has a resolve-by value chosen.
After renaming the mismatched column headers in the mapping table, the tiles for those fields turn green. Once you have also selected a SKU via the SKU picker tile, all required fields are satisfied, the counter turns green, and the Upload button on the next step becomes available.

Overriding a value for every row
Some required fields cannot come from a column in the file — instead, you pick a single record that applies to every row of the upload. Clicking the picker tile opens a search dialog.
Two picker tiles work this way:
- SKU tile (Items uploads) — labelled SKU. Click it to open the Select SKU / Category dialog and choose a SKU.
- Template tile (Places, Persons, Collections, and SKUs uploads) — labelled Template. Click it to open the Select Template dialog and choose a template.
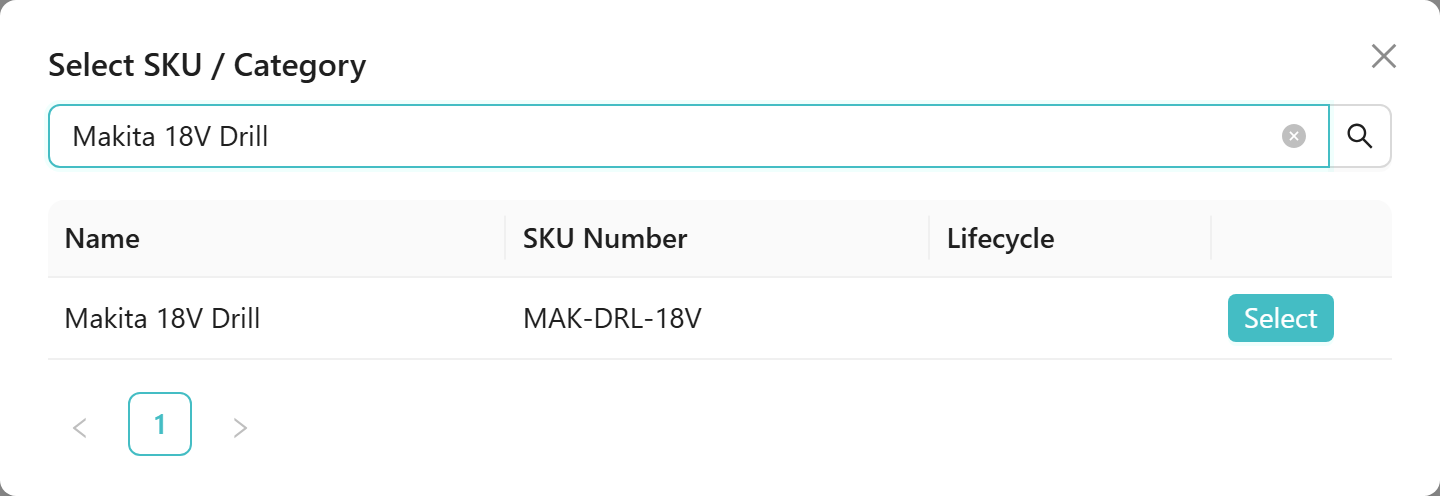
Type in the search box to locate the record, then click Select. The picker closes, the tile turns green, and the chosen record's name appears inside the tile.
Required extended properties join the panel as new tiles. When you select a SKU or Template, the wizard loads that record's required extended properties and adds each one as a new tile in the Required Fields panel. Each new tile must also be satisfied — by a matching column in the file or by a further picker selection — before the Upload button is enabled.
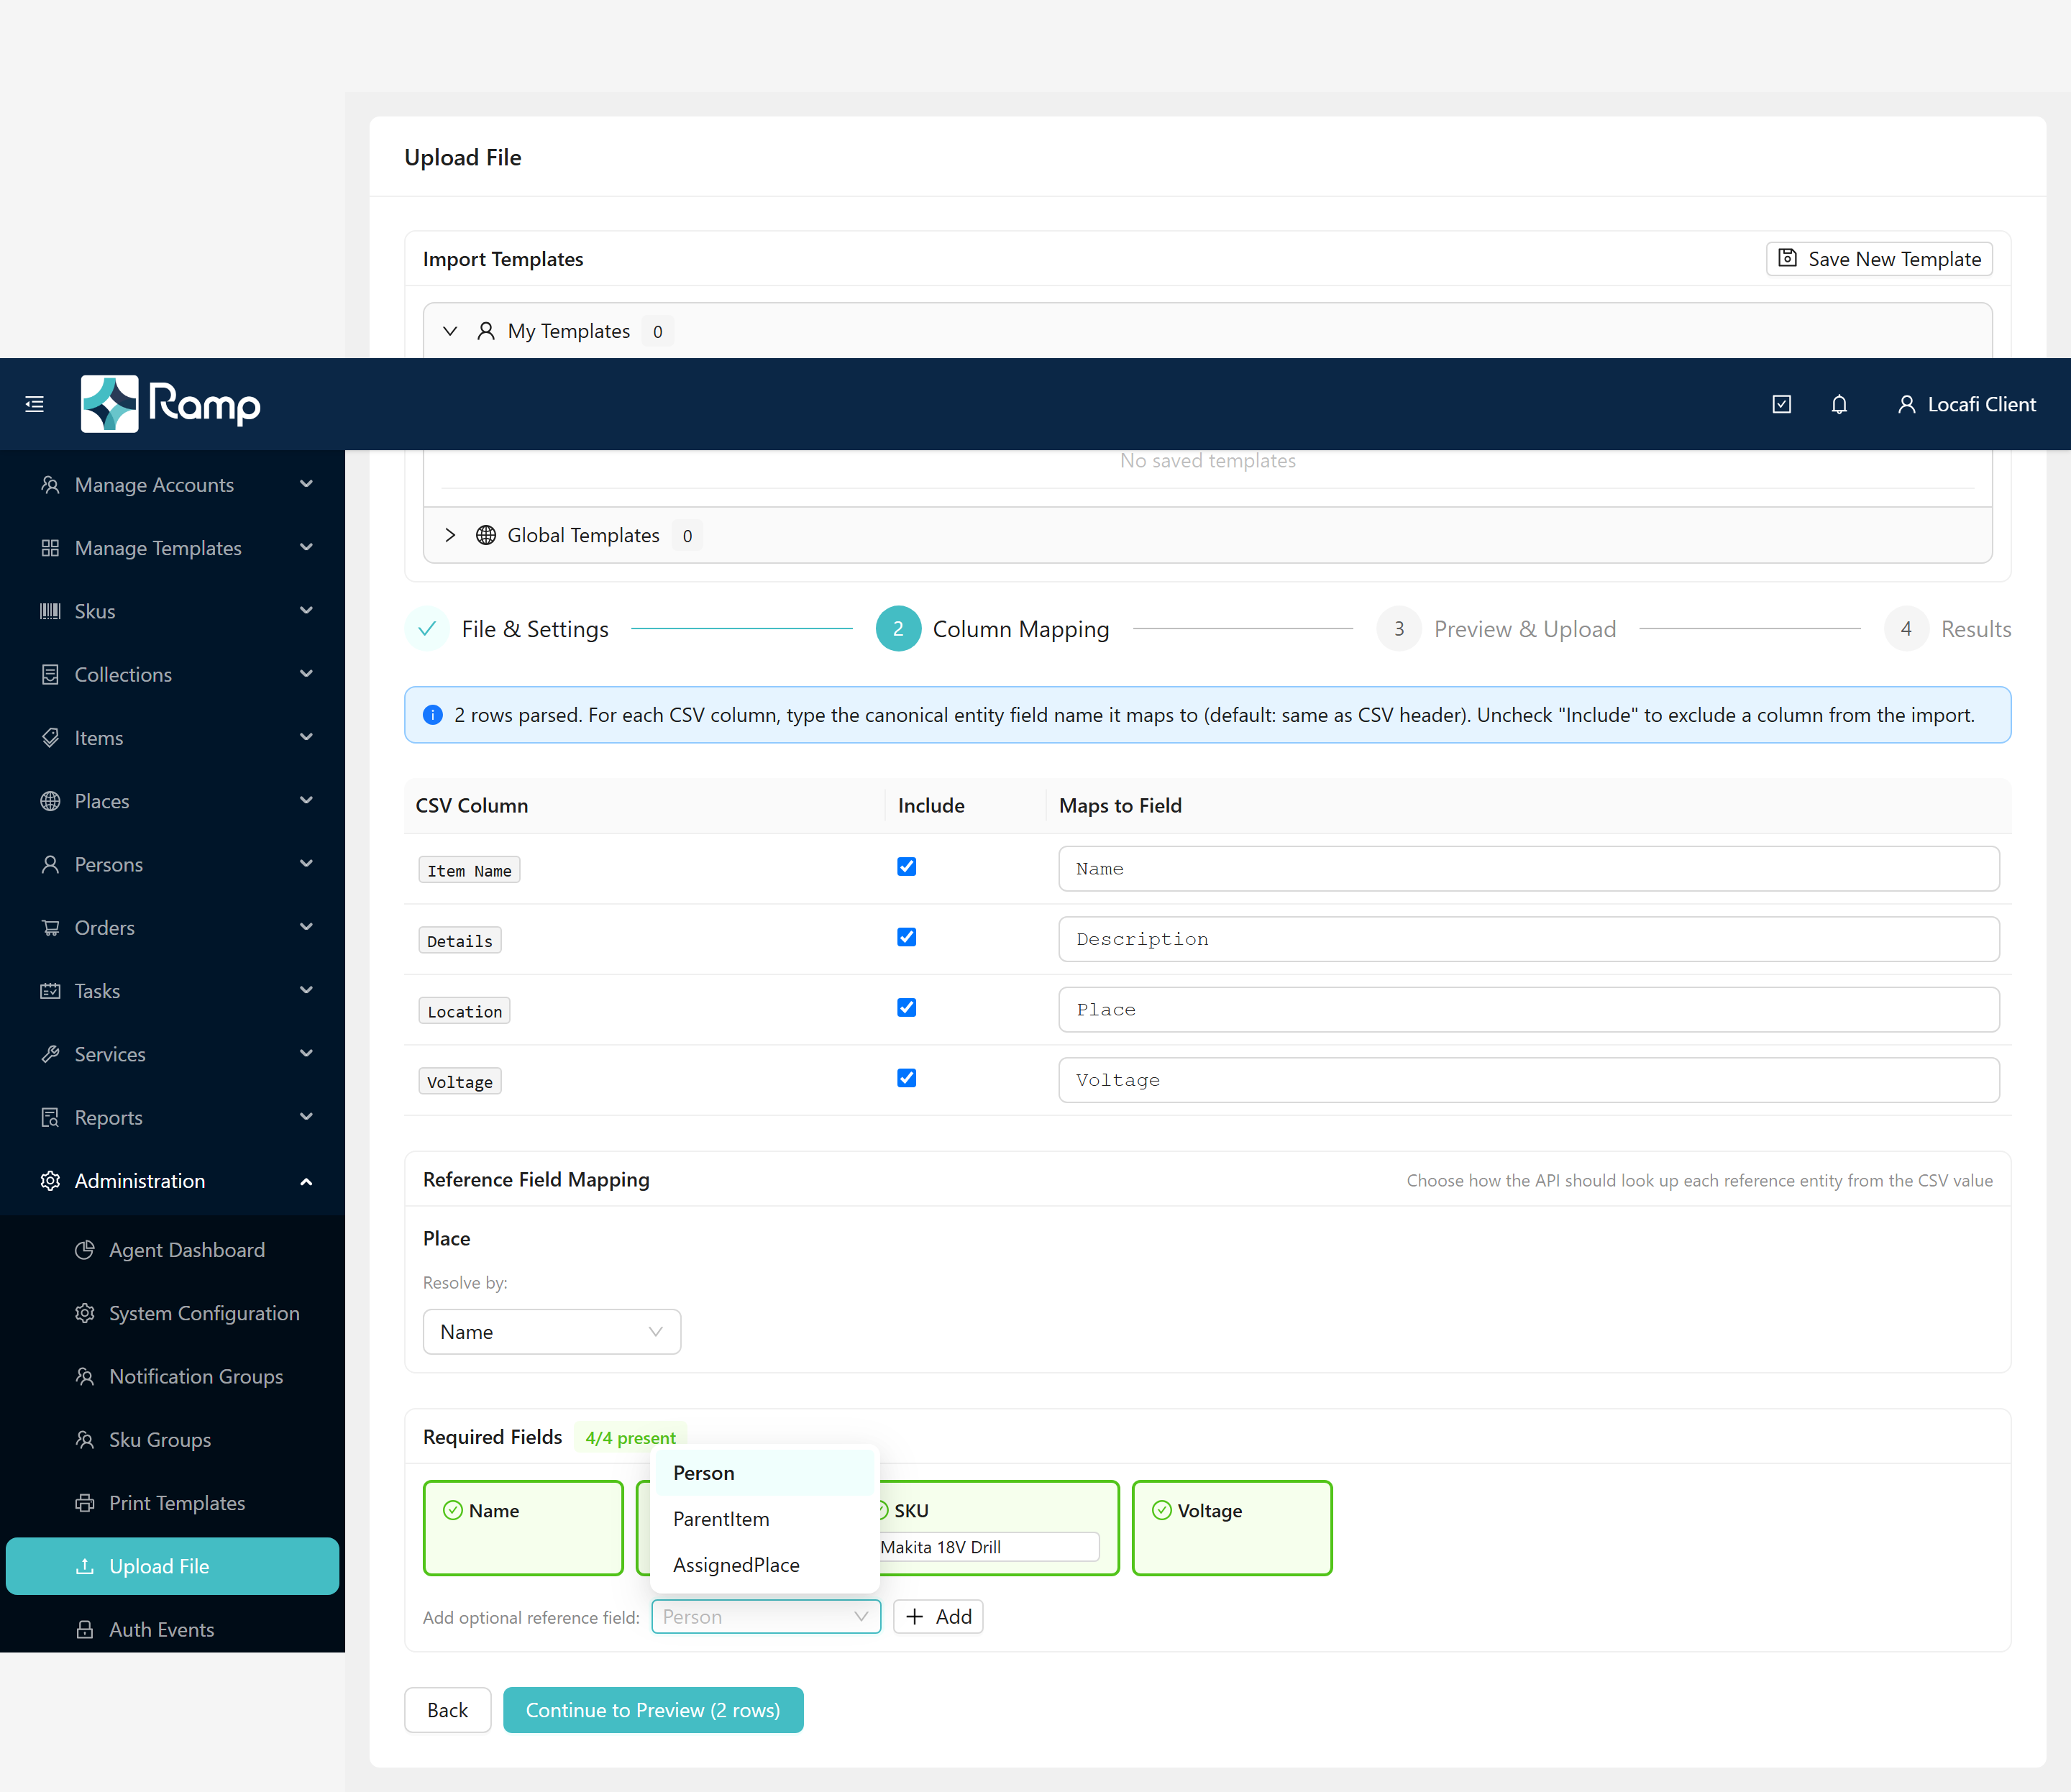
For example, the Makita 18V Drill SKU has a required Voltage extended property. Selecting it adds a Voltage tile to the panel. Because the file already contains a Voltage column, that tile turns green immediately (as shown in the Required Fields panel screenshot above).
Optional reference fields
Below the required tiles, the panel shows an Add optional reference field control: a dropdown and an + Add button. Select a field from the dropdown and click Add to include it in the upload. Added tiles appear in the panel with their own resolve-by choice and a × button to remove them.
Optional reference fields available per upload type:
| Upload type | Optional reference fields |
|---|---|
| Items | Place, Person, ParentItem, AssignedPlace |
| Places | ParentPlace |
| Persons | Place, AssignedPlace |
| Orders | FromPlace, ToPlace, Item, Sku |
| Service Records | FromPlace, ToPlace, Reason |
| Collections (Update Only) | The tenant's reference-type extended properties, loaded dynamically |
Resolve by — how references are matched
The Reference Field Mapping panel appears automatically whenever a mapped column is a reference field. For example, Place always appears for Items imports because each item requires an assigned place. The panel also shows an entry for each optional reference field you have added.
Each reference entry shows a Resolve by dropdown. Your CSV cell holds a value (such as a place name or a tag number); the resolve-by choice tells the wizard which field to look that value up against when finding the matching record.

Resolve-by options per reference type:
| Reference type | Resolve-by options |
|---|---|
| Place | Name, PlaceCode, GLN, TagNumber |
| Person | Email, Name, TagNumber |
| Item | TagNumber, AssetNumber, Name |
| SKU | SkuNumber, BarcodeNumber, Name |
| ServiceMaster | ServiceCode |
| Reason | Name |
| Collection | Name |
The Place mapping that appears automatically for item imports comes pre-set to resolve by Name — change it if your file holds place codes, GLNs, or tag numbers. Reference fields you add yourself start without a selection when more than one resolve-by option exists; choose one before uploading.
When a reference column is included in the file and a row's cell is blank, an update operation clears that link for the record. For example, a blank cell in a TagNumber column unlinks the RFID tag from that record. Only include a reference column if you intend to set or clear the value on every row. If you do not want to change a reference field at all, untick its Include checkbox instead.
Allow Multiple SKUs
When Allow Multiple SKUs is ticked on the first step (available for Items with Create Only (Ignores Duplicates) or Create or Update), the mapping step handles SKUs differently:
- A Sku tile appears in the optional reference fields section of the panel rather than as a required picker tile.
- Your CSV must contain a
Skucolumn; each row can reference a different SKU. - The Resolve by dropdown for the Sku field controls which SKU field (SkuNumber, BarcodeNumber, or Name) the wizard uses to match each row's value.
- The required extended-property tiles in the Required Fields panel become the union of all the referenced SKUs' required item-level extended properties — one tile per distinct extended property across all SKUs in the file.
The SKU picker tile is satisfied by the presence of the Sku column; no single picker selection is needed when Allow Multiple SKUs is on.
Uploading Persons
When the upload type is Persons, the Required Fields panel shows separate GivenName and Surname tiles rather than a single Name tile. Both must be satisfied by mapped columns in your file.
If you chose Name as the unique field, the wizard combines the GivenName and Surname values from each row into a single GivenName Surname string for the lookup. Ensure both columns are present and correctly mapped for the match to work.
Related concepts:
- Templates & extended properties — how templates define the extended-property schema items, SKUs, and places inherit.
- Items & item states — the lifecycle states an item moves through.
Related guides:
- Upload a file — how to choose a file, configure import settings, and run the upload.
- Column reference by upload type — exact field names and value formats for every upload type.
- Save & reuse import templates — save your mapping settings as a template to reload on future imports.