Upload a file
File Upload lets you create, update, or delete records in bulk from a spreadsheet exported as a CSV or TSV file. Instead of adding items, places, people, or orders one at a time through the portal forms, you build your data in a spreadsheet, upload the file, map its columns, and let the wizard apply the changes in one guided run.
You must have the FileImport/Create permission to use this page. Without it the page shows: "You do not have permission to import files (requires FileImport/Create)." and the New Import button is absent.
The wizard has four steps: File & Settings → Column Mapping → Preview & Upload → Results.
Step 1 — Choose your file
In the sidebar, select Upload File under Administration. The Upload File card opens at the File & Settings step.
The Select File card at the top contains a dragger labelled Click or drag a CSV / TSV file here. Click it or drop your file onto it. Once chosen, the filename appears inside the dragger.
Below the dragger, set two options:
- Delimiter — choose Comma (CSV), Tab (TSV), or Custom. Selecting Custom reveals a short text input (up to five characters; placeholder "e.g. ;") where you type the delimiter your file uses.
- File has header row — choose Yes if your file's first row contains column names (the usual case), or No if it starts directly with data. Choosing No causes the wizard to generate synthetic headers Column 1, Column 2, … for the mapping step.
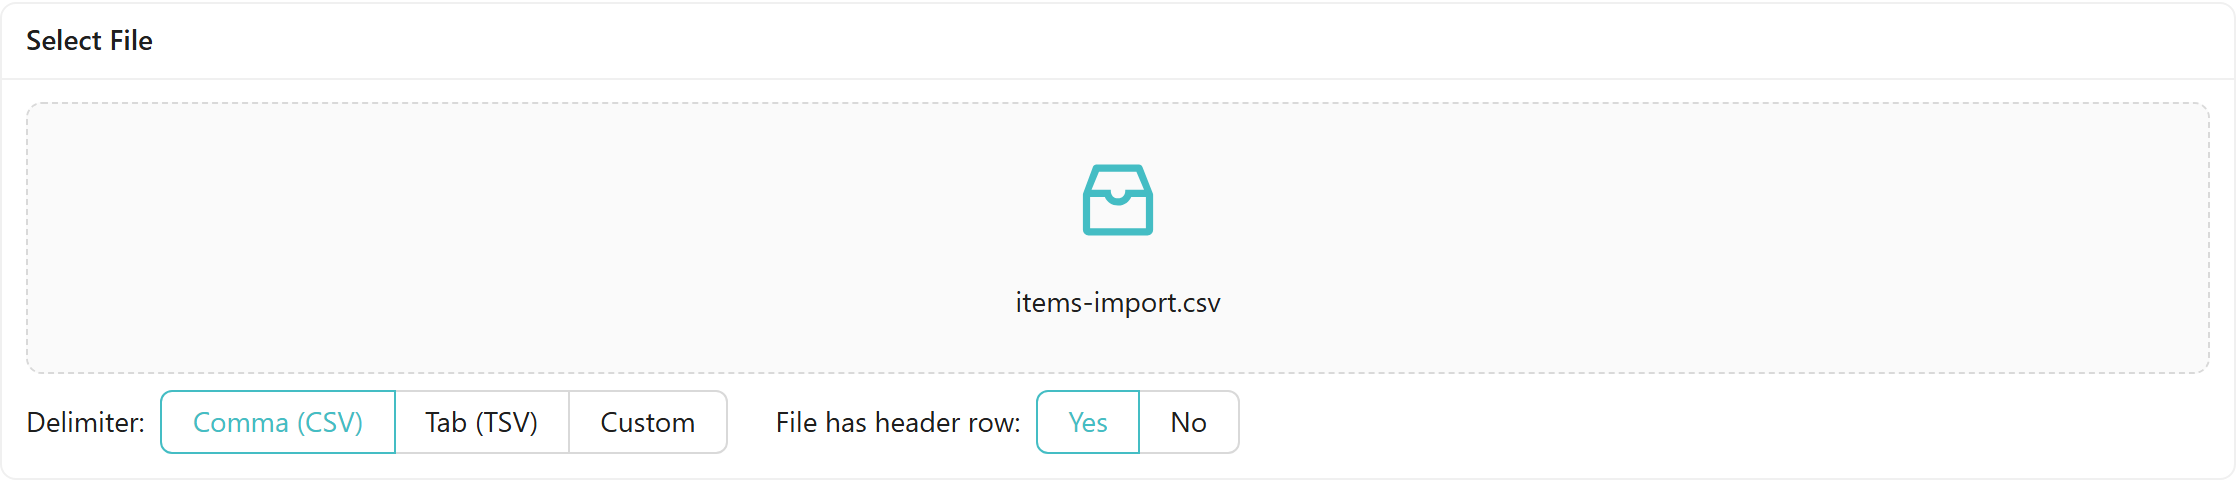
Choose the import settings
The Import Settings card sits below the Select File card on the same screen. Configure the three selects before clicking New Import.
Upload Type
Choose the kind of record this file contains: Items, SKUs, Places, Persons, Collections, Orders, or Service Records. The Upload Type controls which columns the wizard recognises and which fields are required.
Upload Operation
Choose what the wizard does with each row:
| Operation | What it does | Unmatched rows |
|---|---|---|
| Create Only (Ignores Duplicates) | Creates a new record for each row. A row whose unique-field value matches an existing record is skipped and reported as Warning ("already exists"). | — |
| Create or Update | Updates records that match on the unique field; creates the rest. | Created |
| Update Only (Ignores New) | Updates records that match on the unique field. A row that does not match any existing record is skipped and reported as Warning ("not found"). | Skipped (Warning) |
| Delete | Deletes records that match on the unique field. A row that does not match any existing record reports "does not exist". | — |
Selecting Delete with Upload Type set to Orders does not delete any order. Every row in the file reports "Operation not supported". Use the portal's Orders pages to delete orders individually.
Unique Field
The unique field is the column the wizard uses to match each row to an existing record. For the match to work reliably, the value must identify exactly one record — if several existing records share the same value, all of them are updated (no warning is shown). Make sure the value is unique across your existing records before uploading with this field.
The available options depend on the Upload Type:
| Upload Type | Unique Field options |
|---|---|
| Items | TagNumber, AssetNumber, Name |
| Places | TagNumber, PlaceCode, GLN, Name |
| Persons | Email, TagNumber, Name |
| Collections | Name |
| SKUs | BarcodeNumber, SkuNumber, Name |
| Orders | OrderNumber |
| Service Records | ServiceNumber |
When you match Persons by Name, the wizard combines GivenName and Surname from your file into a single "GivenName Surname" string for the lookup. Make sure those two columns are present and correctly mapped.
Allow Multiple SKUs
When Upload Type is Items and the operation is Create Only (Ignores Duplicates) or Create or Update, an Allow Multiple SKUs checkbox appears below the Unique Field select. Tick it to allow different rows in the same file to reference different SKUs via a per-row Sku column. See Map columns & required fields for how the SKU column works in the mapping step.
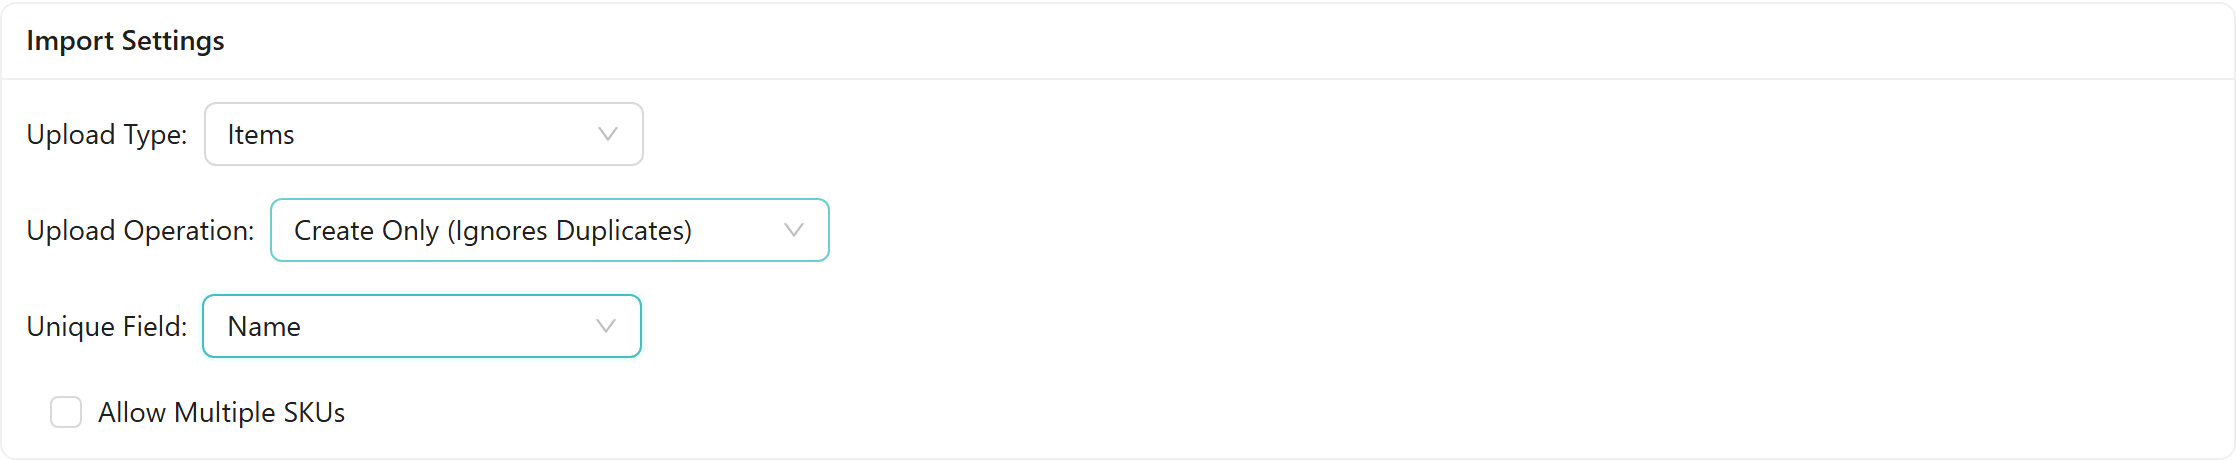
Once you have chosen your file and settings, click New Import (the primary button, disabled until a file is chosen). The file is parsed locally — no data is sent to the server yet.
Preview and upload
New Import advances the wizard to Step 2 · Column Mapping. On that step you tell the wizard which CSV column maps to which field and satisfy the required-field panel. See Map columns & required fields for full details.
After completing the mapping step, click Continue to Preview (N rows) to reach Step 3 · Preview & Upload.
The preview table shows every included column. When a CSV header was renamed in the mapping step, the column title shows the original header followed by an arrow and the mapped name (CSV header → mapped-name). Review the rows to confirm the data looks right before uploading.
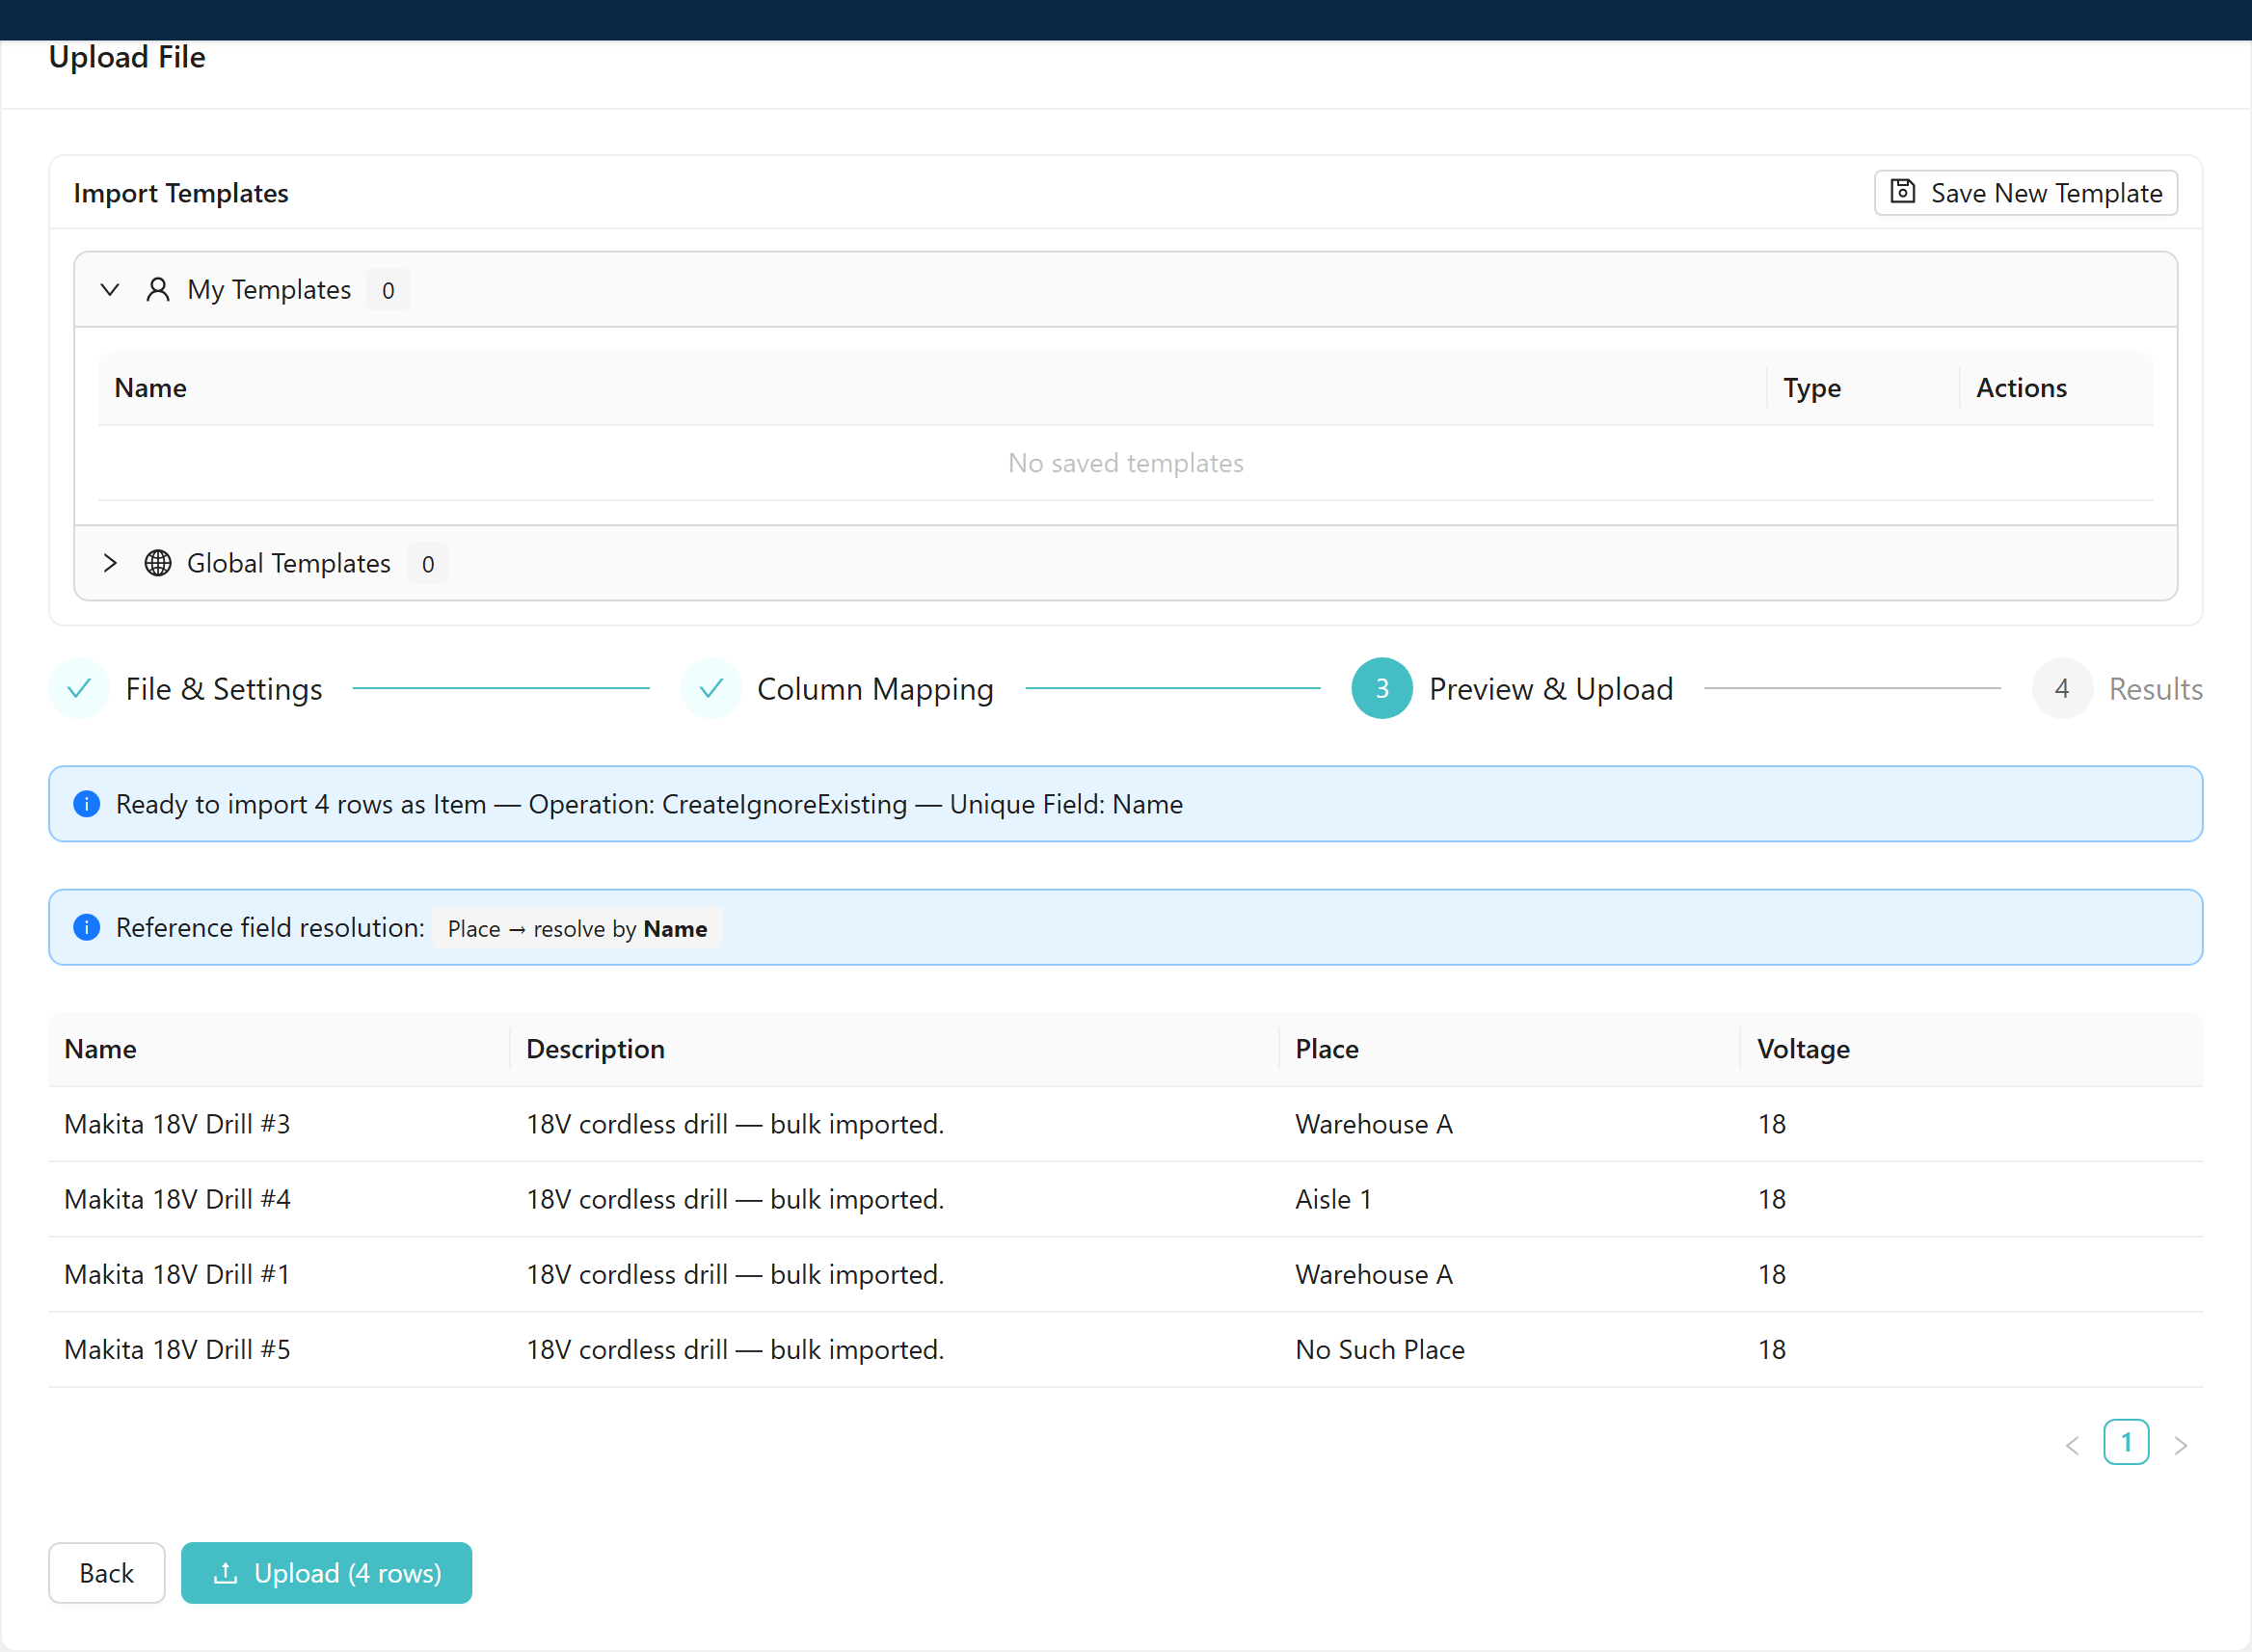
When you are satisfied, click Upload (N rows) to begin the import. A progress bar tracks the upload as it runs.
Batching and stop-on-failure: rows are sent to the server in batches of 100. If a batch fails, the upload stops immediately — the remaining batches are not sent. Batches that were already sent before the failure are applied to the database and cannot be automatically rolled back. When a batch fails, a banner appears:
The upload has been stopped due to an error in the file. To retry the upload, start a new import with valid data.
Click Back on the Preview & Upload step to return to the Column Mapping step if you need to adjust the mapping before uploading.
Read the results
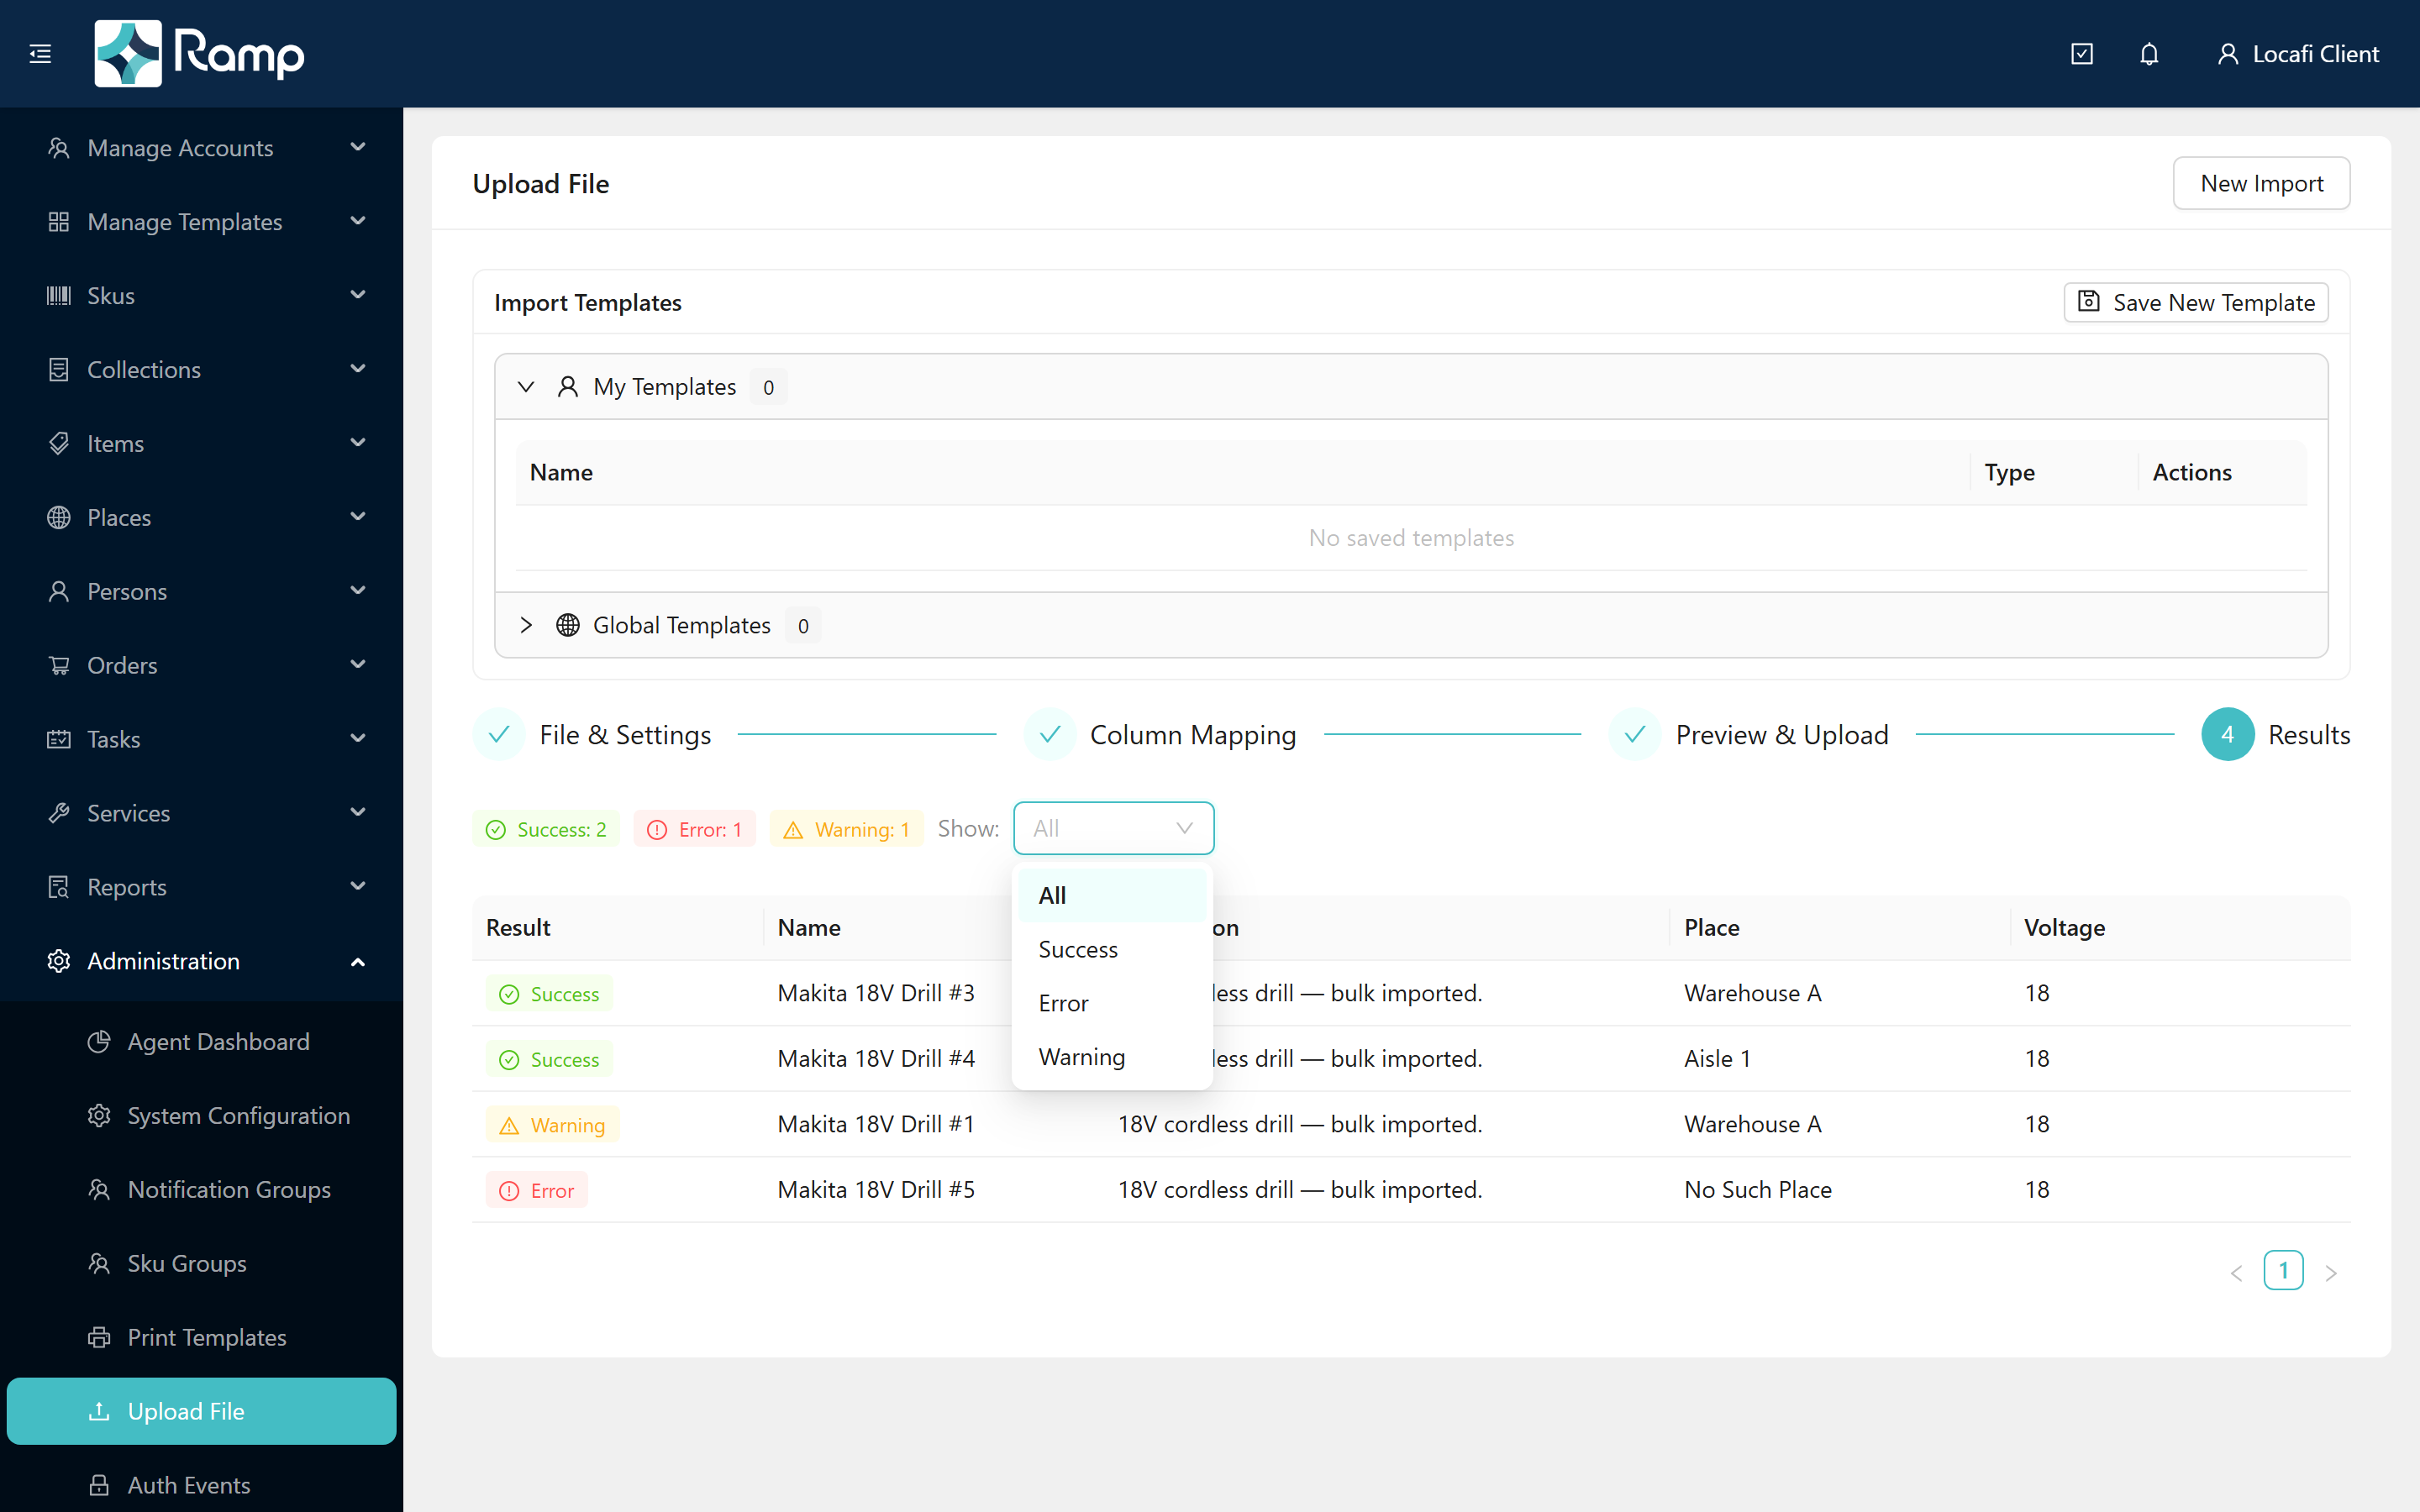
After the upload completes the wizard advances to Step 4 · Results.
At the top of the results area, three or four tag counts summarise the outcome:
- Success: N (green) — rows that were created, updated, or deleted successfully.
- Error: N (red) — rows that failed (for example, a referenced place does not exist).
- Warning: N (yellow) — rows that were skipped. Warning is not a partial success; the row was not applied to the database at all.
- Not processed: N (grey) — rows that were not reached because an earlier batch stopped the upload.
Warning explained: a Warning row is always a skip. Two common reasons:
- Already exists — with Create Only (Ignores Duplicates), a row whose unique-field value matched an existing record was skipped (for example, "Item already exists").
- Not found — with Update Only (Ignores New), a row whose unique-field value did not match any existing record was skipped.
Below the tag counts, the results table lists every row colour-coded to match its tag. Hover the Result cell on any row to see the per-row message — for example, "Item Created", "Specified Place does not exist", or "Item already exists".
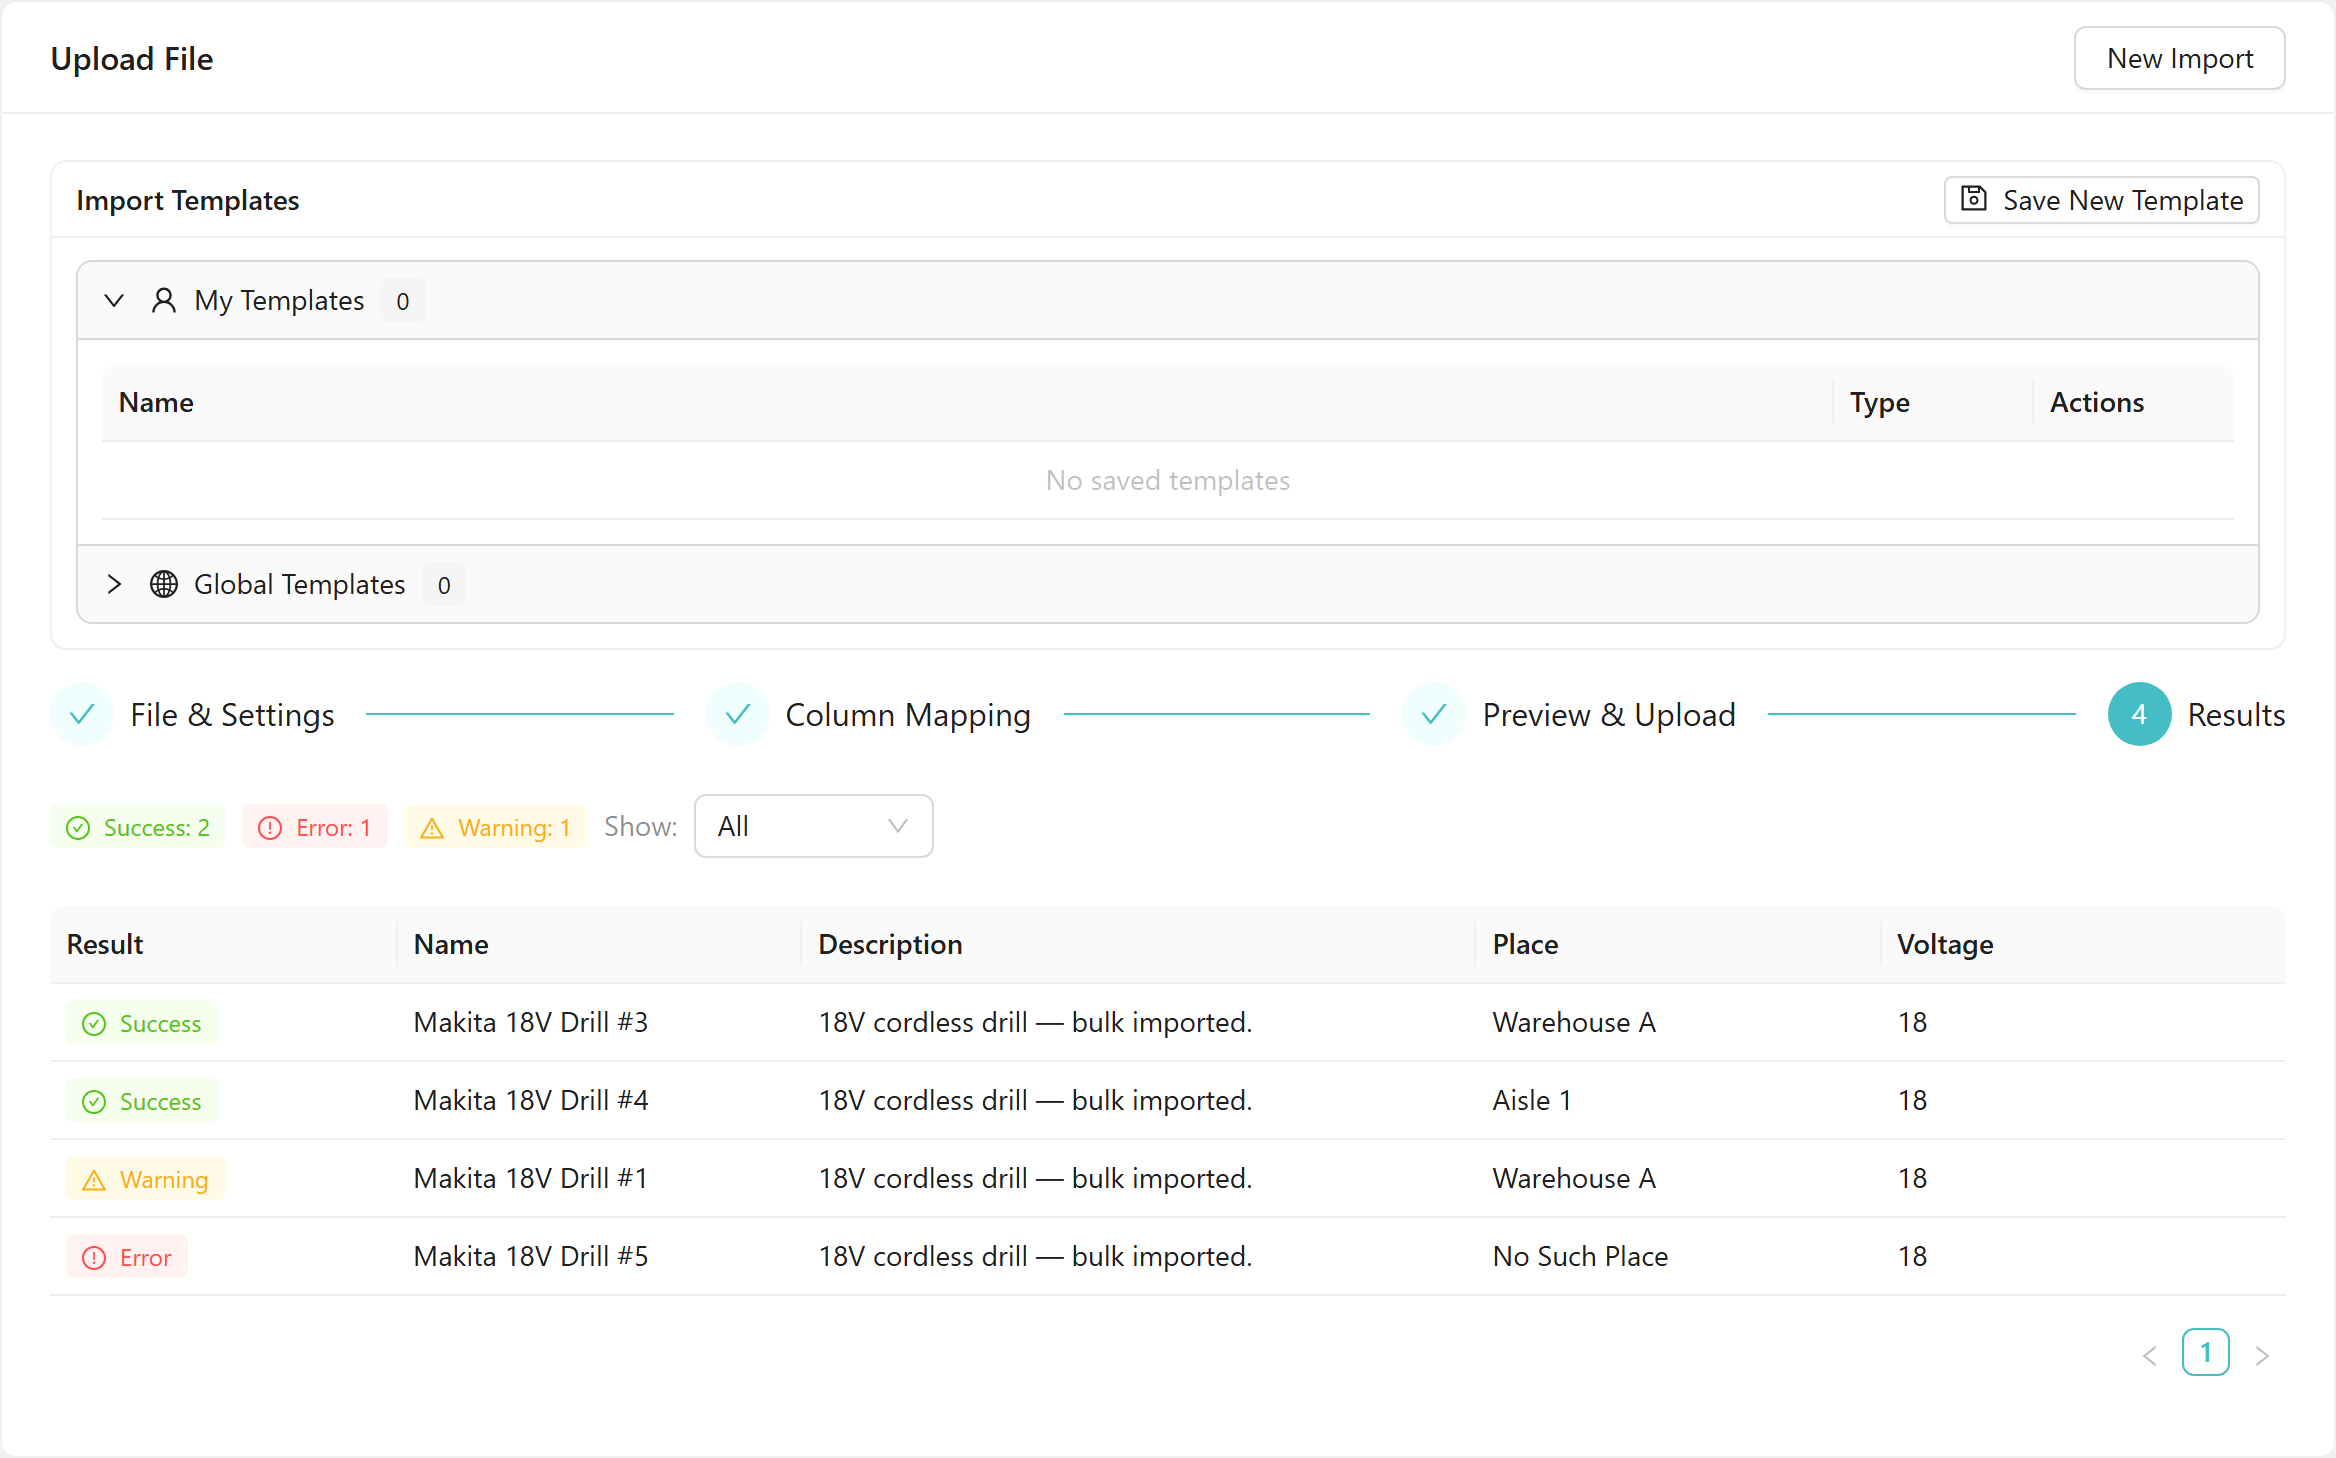
The Import Templates panel at the top of the card is covered in Save & reuse import templates.
Filter the results
Use the Show: select to filter the table to a single result type:
- All — show every row (the default).
- Success — show only successful rows.
- Error — show only failed rows.
- Warning — show only skipped rows.
The filter is applied client-side and does not re-run the import.
Start a new import
Click New Import in the card header to reset the wizard and return to Step 1 · File & Settings. The results are discarded.
If you export the results table and re-import the file to fix errors, the Result column from the export is automatically excluded from the mapping step (it is unchecked by default). You do not need to remove it from the file before re-uploading.
Related guides:
- Map columns & required fields — how to rename columns, satisfy required fields, and set reference resolve-by options.
- Column reference by upload type — exact column names and value formats for every upload type.
- Save & reuse import templates — save your mapping settings as a template to reload on future imports.